Creating Extension for VS-Code

Almost all of us have used extensions in vs-code, some of the popular extensions are like TSLine, ESLint etc. But how many of us ever wondered how we can build our extension for vs-code and can deploy it in the marketplace. In this tutorial, we will be doing the same, which means we will be doing the following
- Installing Node.js
- Yeoman installation to create the project structure
- Implementing the extension’s functionality
- Packaging the Extension
- Deploying in the market place
So you see it’s very simple and easy.
This tutorial requires basic knowledge of Node.js, if you’ve not started with node, then go through this tutorial
Installing Node.js
In case Node is not installed in your system then please download Node.js from this link, After opening the link you should be seeing the following screen.

Click on the Windows Installer 64/32 bit depending on your system. This tutorial was created on windows environment, however, if you’re using mac then for macOS you can choose the macOS installer since it only comes with 64-bit so no confusion there.
Once downloaded, install it. On completion of installation open the command prompt and run the following commands
node –versionnpm –version
If the Node is successfully installed in your system then you should be getting the following screen

So we are all set to start the actual work.

Yeoman installation
To create an extension for vs-code you need to have yeoman installed in your system If you don’t know what yeoman is then read their documentation from this link. It is a generic scaffolding tool, that helps you focus on your actual feature implementation instead of setting up the project dependencies.
Now run the command prompt and run the following command, this will install yeoman globally.
npm install -g yo generator-codeOnce you’re done with yo installation, create a directory in your preferred location and open command prompt from there, after that run the following command
yo code *You should get a screen similar to this
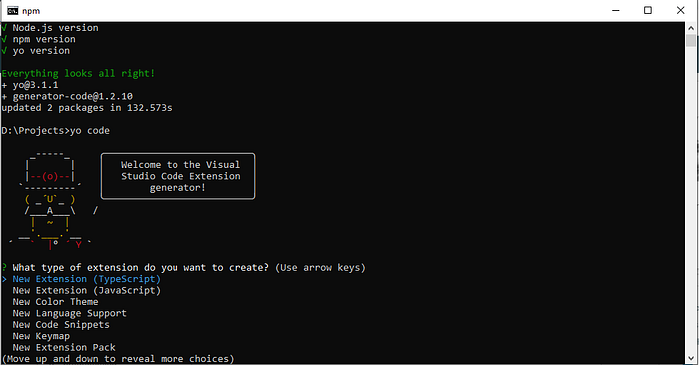
Select New Extension (JavaScript) as we will developing the extension using JavaScript. It will be prompting a few more questions as stated below
# What’s the name of your extension?
# What’s the identifier of your extension?
# What’s the description of your extension? LEAVE BLANK FOR NOW
# Initialize a git repository? Yes
# Which package manager to use? npm
You can change these values at any point in time I’ll be showing it shortly how to do that. Now move into the directory in which you have initialized the scaffolding by using
cd <directory name>And then open vs-code using the following command.
code .You should see the following files in your vs-code explorer panel.

Now open package.json from the explorer and you can see all the values that have been entered during yo scaffolding. You can edit the values as per your convenience. Move to line number 23 you should see this
“activationEvents”: [“onCommand:extension.helloWorld”]
Now, this is very important the activation of this extension will happen based on this command name. Let’s change this to the following
“activationEvents”: [“onCommand:extension.createTemplate”]
You do have to modify the same at line number 28
“commands”: [
     {“command”: “extension.createTemplate”,“title”: “Create Web Template”}]
If you look at line number 26 then you should the following
“main”: “./extension.js”extension.js is the place where will be writing our actual plugin implementation. Open the extension.js file and navigate to function activate(context), this is the place which gets invoked once the “createTemplate” command gets executed.
Notice vscode.commands.registerCommand, this method registering the command which we have already seen in package.json, change it to the same value with package.json.
Implementing the extension’s functionality
Our extension will be very simple. It will be creating a simple web template consisting of 3 files
- index.html — Consists of default HTML structure and referencing the styles.css and app.js
- styles.css
- app.js
We will be using Node.js to implement this feature. Let’s add the reference of the following node packages at the top of the extension.js
const fs = require(“fs”);const path = require(“path”);
One thing you should’ve noticed that vs-code is already referenced in this project, I’ll explain the need of this later. Now let’s paste the following code snippet inside the registerCommand method.
const htmlContent = `<!DOCTYPE html><html lang=”en”><head><meta charset=”UTF-8″ /><meta name=”viewport” content=”width=device-width, initial-scale=1.0″ /><meta http-equiv=”X-UA-Compatible” content=”ie-edge” /><title>index.html</title><link rel=”stylesheet” href=”styles.css” /></head><body><!– Your Code Goes Here –><script type=”text/javascript” src=”app.js”></script></body></html>`;const cssContent = `.body{}`;const jsContent = `//Javascript code should goes here`;//Code to get the folderPathvar folderPath = vscode.workspace.workspaceFolders[0].uri.fsPath;//Code to create the index.htmlfs.writeFile(path.join(folderPath, “index.html”), htmlContent, err => {if(err){console.error(err);return vscode.window.showErrorMessage(“Failed to create index.html.”);}vscode.window.showInformationMessage(“index.html has been created successfully.”);});//Code to create the styles.cssfs.writeFile(path.join(folderPath, “styles.css”), cssContent, err => {if(err){console.error(err);return vscode.window.showErrorMessage(“Failed to create styles.css.”);}vscode.window.showInformationMessage(“styles.css has been created successfully.”);});//Code to create the app.jsfs.writeFile(path.join(folderPath, “app.js”), jsContent, err => {if(err){console.error(err);return vscode.window.showErrorMessage(“Failed to create app.js.”);}vscode.window.showInformationMessage(“app.js has been successfully created.”);});
Save the file and run the application. Please refer to the screenshot

Once you click on Run another instance of visual code should get open. Click on the Open Folder which can be seen on the explorer panel. Create a new folder and open it in VS Code, now open package installation prompt by pressing Ctrl+Shift+P on windows and Command+Shift+P on Mac, Type the name of the command that you gave, in our case its createTemplate and press enter. TADA, you should see the following.

So our extension is ready and working, now let’s deploy it to the marketplace, so other people can use it as well. Meanwhile, you can check the code from this git repository.
Packaging the Extension
Packaging the extension is very straight forward, it can be done with the CLI tool vsce, this tool can be downloaded from NPM. Install the vsce tool by running the following command
npm install -g vsceSo once the installation is done, you can go to vs-code terminal and run the following command
vsce packageYou should see some error, so when vsce creates the package then it requires information like author information, repository information etc. Please take a reference of the package.json and Readme.md reference from the URL below and modify yours accordingly. once done run the command again.
https://github.com/patravishek/htmlBoilerPlate/blob/develop/package.json
https://github.com/patravishek/htmlBoilerPlate/blob/develop/README.md
On successful execution of the vsce command, you should have the .vsix file created on your system.

As the package is created so we can go ahead and finish the final step to deploy that in the market place.
Deploying in the market place
Deployment can be done in two ways, one is through CLI, just by running the following command
vsce publishOr through marketplace website.
But before anything you need to sign up to marketplace website and get the publisher id. Though this step should come before packaging. so once you obtain the “publisher id”, add it the package.json with the attribute “Publisher” this should be done before you run the vsce publish command.
Now the only step left, uploading the .vsix file to the marketplace, again you can do it by CLI but in this blog, I’ll be showing it using marketplace website.
If you’re already logged into marketplace website then you should see a link Publish Extension, click on that after that click on New Extension. You should see a screen like below

Now upload the .vsix file using this upload panel, and we are done. Once uploaded it will take some to verify it by the Microsoft marketplace algorithm and once everything is done you should see your plugin by searching in the VS-Code marketplace panel. Let’s search ours with our plugin name, which is “HtmlBoilerPlate”. You should be able to see it and on clicking on the result you should be getting all the details regarding the extension, which you’ve mentioned in readme.md file.

So you see it's really si create an extension for vs-code.
If you’ve liked this tutorial then please let me know through the comments section, even if you disliked it and want modification then please let me know as well, I’ll really appreciate all your comments.
If you want more articles like this then let me know via twitter.


